Data Access for ISAM User Manual - Client Setup
Setting up clients to connect to ISAM data
This section explains how to set up Windows client machines to connect to ISAM data on the server.
The procedure involves installing the Easysoft ODBC-ODBC Bridge client and setting up a data source.
Chapter Guide
- Installing the Easysoft ODBC-ODBC Bridge client
- Setting up a data source on your Windows client
- Worked example for Windows clients
Installing the Easysoft ODBC-ODBC Bridge client
You can install the Easysoft ODBC-ODBC Bridge client on either Windows or Unix platforms, but, while installing the Easysoft ODBC-ODBC Bridge client on Unix makes it possible to access your ISAM data from Perl, CGI and Apache/PHP, most users of Easysoft Data Access for ISAM will probably be running Windows machines to access their ISAM server data.
To install the Easysoft ODBC-ODBC Bridge client on Windows:
1. Run the Easysoft ODBC-ODBC Bridge installation file.
This file is supplied as a .exe on Windows (see Obtaining Easysoft Data Access for ISAM).
2. Follow the instructions on screen to install the Easysoft ODBC-ODBC Bridge client component, which must be installed on each machine that will be used to access the server database.
You do not need to license the Easysoft ODBC-ODBC Bridge client, because the client license is covered by the Easysoft ODBC-ODBC Bridge server license that you obtained when licensing Easysoft Data Access for ISAM.
Once you have installed the Easysoft ODBC-ODBC Bridge client, you can set up a data source to connect to the ISAM data on the server (see Setting up a data source on your Windows client).
Please refer to the Easysoft ODBC-ODBC Bridge manual for full details of the client installation on both Windows and Unix.
For details of connecting from a remote JDBC client, please refer to the Easysoft JDBC-ODBC Bridge manual.
Setting up a data source on your Windows client
To enable cross-platform ODBC access to your data using the Easysoft ODBC-ODBC Bridge you need to create a remote data source on your client to connect to your ISAM data on the server.
1. Select Start > Settings > Control Panel, double-click Administrative Tools and then Data Sources (ODBC).
|
Select Start > Settings > Control Panel and double-click ODBC Data Sources (32bit). |
|
Select Start > Settings > Control Panel and double-click Data Sources (ODBC). |
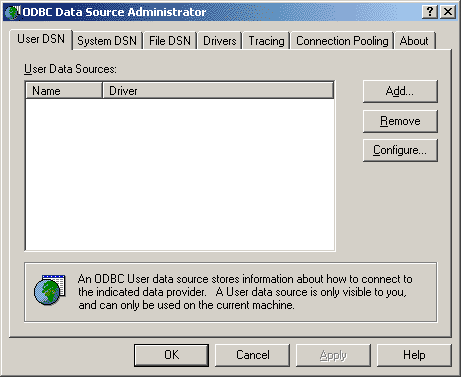
The ODBC Data Source Administrator dialog box is displayed:

2. Select the User DSN tab to set up a data source that only you can access.
Select the System DSN tab to create a data source which is available to anyone who logs on to this Windows machine.
3. Click Add to add a new DSN.
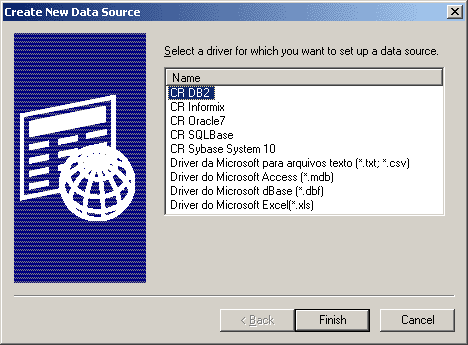
The Create New Data Source dialog box displays a list of the drivers which are available:

4. Select Easysoft ODBC-ODBC Bridge and then click Finish.
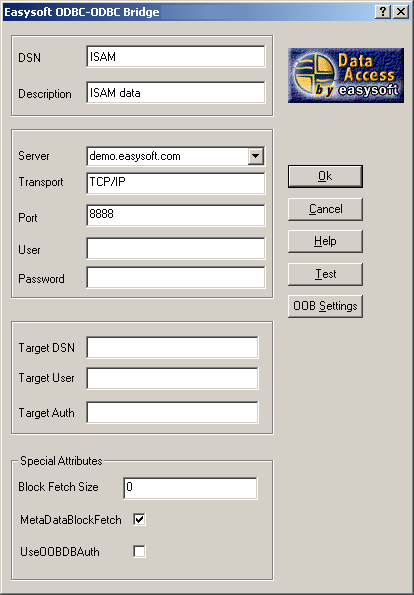
The Easysoft ODBC-ODBC Bridge dialog box is displayed:

5. In the DSN field, type a name for the data source, e.g. "ISAM".
Choose carefully because you cannot change this later.
6. In the Description field, type a description for the data in the data source, e.g. "ISAM data".
7. In the Server box, type the hostname or IP address of the ISAM server.
8. The Transport field shows the network transport protocol that will be used to connect to the data.
By default this is set to TCP/IP because this is the only protocol currently supported.
9. The Port field shows the port number on the server at which the Easysoft ODBC-ODBC Bridge server is listening for connections.
Accept the default (8888) unless you know that the server is listening at a different port.
10. In the User and Password fields, type the user name and password that you use to log on to the server machine on which the ISAM data is stored.
11. In the TargetDSN field, type the name of the ISAM data source on the server machine.
Your system administrator will be able to tell you what this name is.
12. In the Target User and Target Auth fields, type the user name and password that you use to log on to your ISAM server database.
Your system administrator will be able to tell you what your logon details are.
13. Set Block Fetch Size to 10.
This means that rows of data will be returned in blocks of 10 instead of one row at a time, resulting in faster performance.
However, you should set this value to 1 if your ODBC application uses cursors or positioned updates/deletes.
14. Click Test to see if this data source can connect to the data on the server.
The results are displayed in a separate window.
15. If the test is successful, click OK in the Easysoft ODBC-ODBC Bridge dialog box.
The new data source is listed on the User DSN or System DSN tab of the ODBC Data Source Administrator.
16. Click OK to close the ODBC Data Source Administrator.
Possible reasons for an unsuccessful test are:
- if you see an "Authentication Failure" error, double-check the User and Password settings.
- if you see a "Failed to connect to remote driver" error and additional text in which a login failure is noted, double-check the Target User and Target Auth settings.
- if you see an error referring to data sources or DSNs, double-check the Target DSN name.
- if you see a message referring to RPC, the client cannot connect to the Easysoft ODBC-ODBC Bridge server, so double-check the Server, Transport and Port settings.
Worked example for Windows clients
This section provides a worked example of using Microsoft Excel 97 to connect to your ISAM data source.
This worked example assumes that:
- you have a data source connecting to your ISAM data on the server. Consult your system administrator if you need to create a data source and are unsure where the data is stored on the server.
- your system administrator has given you access (via Easysoft Data Access for ISAM) to at least the SALES_CUSTOMER table in the data source.
- you have Microsoft Query installed (so that the Data > Get External Data command is available).
- you are familiar with the basics of using Microsoft Excel.
To obtain a list of customers and display the results in Microsoft Excel:
1. Run Microsoft Excel.
2. Select Data > Get External Data > Create New Query.
3. On the Choose Data Source dialog box, select the data source that connects to your ISAM data.
4. Make sure the User Query Wizard to create/edit queries option is selected (the box is ticked when the option is selected).
5. Click OK on the dialog box.
6. On the Query Wizard - Choose Columns dialog box, scroll down the list of tables to find the SALES_CUSTOMER table.
7. Click the + adjacent to this table to view the columns within it.
8. Select each of the following columns in turn, and click > so that they are listed in the Columns in your query box:
9. Click Next on this and the following dialog boxes until the Query Wizard - Finish dialog box is displayed.
10. Ensure that Return Data to Microsoft Excel is selected, then click Finish.
11. On the Returning External Data to Microsoft Excel dialog box, select Existing worksheet then click OK.
A list of customers and their addresses is displayed in the worksheet.
You could try creating another query using columns from both the SOP_ORDER_HEADER table and SOP_ORDER_DETAIL table to display a list of what these customers have purchased.
When you have finished querying your data, close Microsoft Excel unless you want to continue using it for another task.