This section explains how to install, license and remove the Easysoft JDBC-ODBC Bridge on supported Windows and Unix platforms.
The Windows installation can be carried out by anyone with local administrator privileges for the target machine.
The Unix installation assumes you are, or have available for consultation, a system administrator.
There are three ways to obtain the Easysoft JDBC-ODBC Bridge:
Select Download from the Easysoft JDBC-ODBC Bridge section of the website and then choose the platform release that you require.
First time visitors must complete the new user form and click Register. Note that your personal Internet options may require you to login and click Continue if you have previously registered.
Change to the pub/jdbc-odbc-bridge directory and then choose the platform release that you require.
The Easysoft JDBC-ODBC Bridge consists of the following product components:
The JOB Driver is 100% Java and can be installed on any machine supporting Java by copying it to a suitable place in the filestore and setting the appropriate value in the CLASSPATH environment variable.
The JOB Server is platform-specific, so be sure to download the correct distribution.
In the distribution are the driver classes, the JOB Server (including the Web Administrator), shared components needed to license and run the JOB Server, and documentation files.
The Unix distribution also includes the unixODBC Driver Manager.
Windows users should have already received a driver manager with their ODBC Driver.
|
If you need the Microsoft Windows driver manager, go to http://support.microsoft.com and search for MDAC, Microsoft Data Access Components.. See http://www.unixodbc.org for the full set of unixODBC data access components. |
The name of the install file varies from platform to platform, but is of the form:
where "x" is the major version number, "y" is the minor version number and "z" is the build index, which is incremented when minor changes are made.
"platform" will vary depending on the operating system distribution you require and you may come across files of the form:
within specific Unix platforms, where "platform-variation" refers to alternative versions available for a single platform.
|
Select the highest release available for your platform within your licensed major version number (installing software of a different major version number requires a new Easysoft license). |
Unix filenames may also be suffixed with .gz for a "gzipped" archive, or .Z for a "compressed" archive.
You can now download a file and begin the installation process.
Refer to the section relevant to your platform to continue:
Follow the on screen instructions.
When prompted to choose a Setup type, do one of the following:
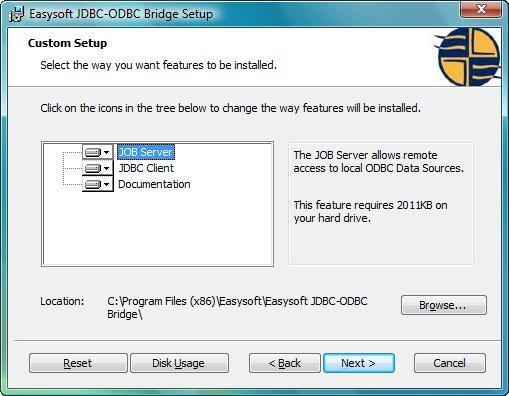
The Custom Setup dialog box has two panes. The left pane shows a tree view of the features that you can install and you can expand a feature to view its subfeatures. The right pane displays feature descriptions. When you click a feature or subfeature, the Feature description pane displays a description of the selection and its disk space requirements.
To add or remove a feature, click the arrow next to the feature name, and then choose one of the following options from the drop-down list:
The default installation directory is drive:\Program Files\Easysoft\Easysoft JDBC-ODBC Bridge. To change the installation directory, click Browse.
To restore the default list of features to install, click Reset. To check that you have enough disk space to install the features you want, click Disk Usage.
If you chose to install the Easysoft JDBC-ODBC Bridge Server, the Initial Server Configuration dialog box is displayed:
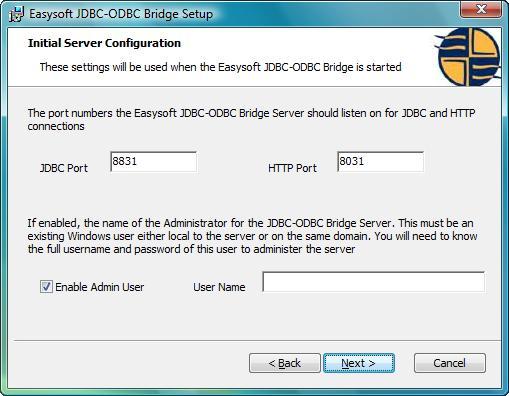
JDBC Port defines the port where the Easysoft JDBC-ODBC Bridge Server will listen for Easysoft JDBC-ODBC Bridge Client connections
|
Changing the value of JDBC Port will mean changing the JDBC URL used in your application. |
.
HTTP Port defines the port on which the Easysoft JDBC-ODBC Bridge Server Web Administrator will listen for HTTP requests. Accept the default values unless you have a port conflict.
In the User Name box, enter the login name of an existing Windows user account as the Server Administrator user name.
You also need to know the password for this user, because it will be required when you run the Web Administrator (see The Web Administrator).
To grant group access to the Web Administrator, you may wish to create a specific "Administrator" user.
To allow anyone to have access to the Web Administrator, leave the Username field blank or click to clear Enable Admin User to remove the requirement to log in.
|
You should consider carefully whether you wish to allow anyone on your network to have access to the Web Administrator in order to change Easysoft JDBC-ODBC Bridge settings. |
To avoid rebooting your computer, the Easysoft JDBC-ODBC Bridge installer prompts you when files that it needs to update are in use by another application or service. This frees the locked files and allows the installation to complete without a system restart.
On Windows Vista, the Easysoft JDBC-ODBC Bridge installer uses the Restart Manager to locate the applications that are using files that need updating. These applications are displayed in the Files in Use dialog box. To avoid a system restart, choose Automatically close applications and attempt to restart them after setup is complete. The Easysoft JDBC-ODBC Bridge installer then uses the Restart Manager to try to stop and restart each application or service in the list. If possible, the Restart Manager restores applications to the same state and with the same data that they were in before it shut them down.
On earlier versions of Windows, when the Files in Use dialog is displayed, manually shut down each application in the list and then click Retry to avoid a system restart.
Only the Easysoft JDBC-ODBC Bridge Server needs to be licensed.
By default, the install program starts the Easysoft License Manager (documented in the Licensing Guide), because you cannot use the Easysoft JDBC-ODBC Bridge Server until a license is obtained.
The following types of license are available:
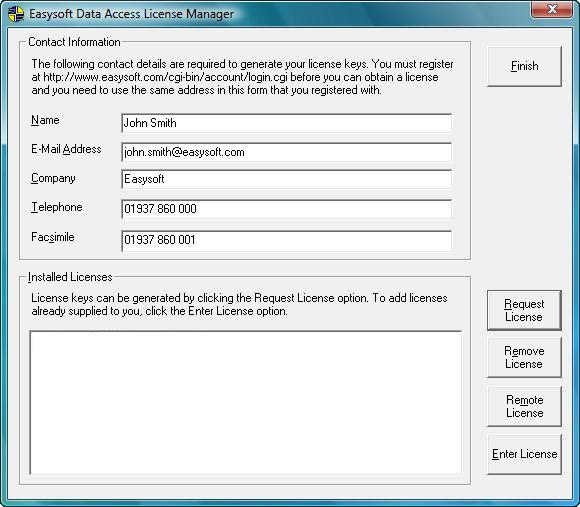
1. Enter your contact details.
You MUST enter the Name, E-Mail Address and Company fields. The e-mail address that you enter here must be the same as the one that you registered with.
The Telephone and Facsimile fields are important if you require Easysoft to contact you by those methods.
You are asked for a license type.
3. For a trial license click Time Limited Trial and then click Next.
The License Manager asks what software you are licensing.
Select your required version of the Easysoft JDBC-ODBC Bridge from the drop-down list and then click Next.
If you have obtained an authorization code for a purchased license, select Non-expiring License and then click Next.
The License Manager requests your authorization code.
Enter the authorization code and then click Next.
The License Manager displays a summary of the information you entered and allows you to choose how to apply for your license.
4. Choose On-line Request if your machine is connected to the internet and can make make outgoing connections on port 8884.
The License Manager then sends a request to the Easysoft license server to activate your license key automatically. This is the quickest method and results in your details being entered immediately into our support database.
|
Only your license request identifier and contact details as they are displayed in the main License Manager screen are sent to Easysoft. |
The remaining three options (Email Request, Print Request and View Request) are all ways to obtain a license if your machine is offline (i.e. does not have a connection to the internet).
Each of these methods involves providing Easysoft with information including your machine number (a number unique to your machine) and then waiting to receive your license key.
Instead of emailing, faxing or telephoning your details to Easysoft, you can enter them directly at the Easysoft web site and your license key will be emailed to you automatically.
To use this method, click View Request, and then visit:
In the Licensing page, enter your machine number (and authorization code for purchased license), click Submit and your license key will be emailed to you.
|
You can copy your machine number from the View Request dialog box using CTRL-C and then paste it into the License Generator by using CTRL-V. |
When you receive the license key, you can activate it either by double-clicking the email attachment or by clicking Enter License on the License Manager main screen and pasting the license key into the dialog box.
A message tells you how many licenses have been added.
|
If you use the Email Request option, the license key is emailed to the email address as displayed on the License Manager screen, not the from: address of your email. |
For more information about the licensing procedure refer to the Licensing Guide.
|
If you add a new license, the Easysoft JDBC-ODBC Bridge Server service needs to be restarted in order to access the new details. During Setup, the Easysoft JDBC-ODBC Bridge Server service is restarted automatically after a license has been added. If you add a license outside of Setup, you need to restart the service manually. For more information about restarting the Easysoft JDBC-ODBC Bridge Server service, see Setting up the JOB Server on Windows. |
5. Click Finish to quit the License Manager.
The Easysoft JDBC-ODBC Bridge installer lets you add or remove Easysoft JDBC-ODBC Bridge components. You can add or remove the Easysoft JDBC-ODBC Bridge Server, Easysoft JDBC-ODBC Bridge Client or Easysoft JDBC-ODBC Bridge documentation.
The installer can also repair a broken Easysoft JDBC-ODBC Bridge installation. For example, you can use the Easysoft JDBC-ODBC Bridge installer to restore missing Easysoft JDBC-ODBC Bridge files or registry keys.
This section explains how to remove the Easysoft JDBC-ODBC Bridge from your system.
The uninstall process is complete.
Any licenses you obtained for the Easysoft JDBC-ODBC Bridge and other Easysoft products are held in the Windows registry.
When you uninstall, your licenses are not removed so you do not need to relicense the product if you reinstall or upgrade.
These instructions show how to install the Easysoft JDBC-ODBC Bridge on Unix platforms.
You should only install this software onto a machine that holds ODBC drivers that you want to access over the JDBC-ODBC Bridge from other machines.
If the ODBC data sources to which you would like to gain remote access from any platform resides on other platforms (such as Linux or Windows), please obtain and install the Easysoft JDBC-ODBC Bridge appropriate for those platforms.
If you wish to gain access to your ODBC Data sources via JDBC from applets, you can use the build in HTTP server to serve them.
For production use it is recommended that you take the Easysoft JDBC-ODBC Bridge Driver classes from <install_path>easysoft/job/EJOB.jar and make them available via your own Webserver.
If you are developing or deploying applications you can download the JDBC-ODBC Bridge Driver classes directly from the machine that runs the server. See the page:
http://<your machine>:<EJOB HTTP PORT>/
If you have ODBC drivers on this machine which you want to access over the JDBC-ODBC Bridge from other machines you should install the server. You must be root to install the server properly as it requires write access to /usr/local tree.
If you are installing the JOB Server to access ODBC drivers on this machine from other machines via the JOB, then Easysoft recommends that you install the unixODBC Driver Manager.
Please remove any old installation tree before reinstalling or installing a new version in the same tree. See the file <install_path>/easysoft//job/doc/uninstall.txt for instructions on how to do this.
The installation script has a minimal set of requirements:
grep, awk, test, cut, ps, sed, cat, wc, uname, tr, find, echo, sum, head
If you are missing any of these commands they can generally be obtained from the Free Software Foundation (http://www.fsf.org).
Depending on the platform, you will need up to 5Mb of disk space free for the installed programs and up to 4Mb temporary space of the installation files themselves. If you install the unixODBC Driver Manager as well, these numbers increase by approximately 1.5Mb.
Untar the tar distribution file. On some platforms this is gzipped or compressed. This should create a directory called "jdbc-odbc-bridge-p.q.r.s.os" (where p.q.r.s is the version and os is the operating system name) containing some further tar files, some checksum files and an installation script ("install")
|
Make sure you read the license agreement (Server-Client-License.txt). |
.
Installing the software shows your acceptance of the terms and conditions in the license agreement.
Throughout the installation you may be asked to supply the answer to some questions. In each case the default will be displayed in square brackets and you need only press <return> to take the default. If there are alternative responses these will be shown in round brackets; to pick one of these type them and press <return>.
Change into the created directory and run the install program with
You will be prompted to read the license file appropriate for your installation and you must answer yes or no to accept the license. If you do not accept the license, the installation will be aborted.
Once the installation has checked you have the necessary shell tools it will autodetect the operating system and check any required dependencies (e.g. version of the C runtime library). Next the install checks the encapsulated tar package(s) by comparing them with a checksum file (do not worry if the md5 checksum is not found as some platforms do not come with md5sum). If this fails you will be given the opportunity to abort the installation.
You will next be prompted for an installation path. All files are installed in a subdirectory of your specified path called "easysoft" e.g. if you pick the default of /usr/local, the JOB will be installed in /usr/local/easysoft and below. Some files outside the installation path will be modified (but not without prompting you first).
If you choose an install path different from the default then the installation will try to symbolically link /usr/local/easysoft to the easysoft in your chosen path. This allows us to distribute binaries with built in dynamic linker run paths. If you are not root or the path /usr/local/easysoft already exists and is not a symbolic link this will fail and you may have to fix the link yourself or define LD_LIBRARY_PATH/LD_RUN_PATH to contain the path <install_path>/easysoft/lib.
You should set LD_LIBARY_PATH/LD_RUN_PATH in the <install_path>/easysoft/job/startjob script.
The JOB is now distributed as 3 or 4 packaged tar files. These tar files are for common elements, EJOB.jar JDBC Driver, and the server. The tar files are all untarred into subdirectories of <install_path>/easysoft. You can consult <install_path>/easysoft/job/INVENTORY.txt for a description of all the files installed.
If the distribution for your platform contains the unixODBC driver manager you will now be asked whether you would like to install it. Easysoft strongly recommend you use the unixODBC Driver Manager because:
The installation will next untar the common tar file. Some files and shared objects are common to multiple Easysoft products. If files shared between Easysoft products are included in the JOB install the installation will check to see if those files already exist or are older. Only if these files do not exist or are older will the shared files be installed. You may see messages like:
versioned shared file <filename> does not exist - installing
versioned shared file <file> is old - replacing
The remainder of the installation installs the JOB server and requires the installer to be the root user. If you are not root the installation will terminate now.
The JOB Server requires a license in order to accept JDBC connections from the JOB driver.
The installation will create the <install_path>/easysoft/license directory if it does not exist and also a licenses template file in that directory.
You can obtain a trial license or register a full license automatically during the installation. When prompted to request an JOB Server license, enter 'y' and the Easysoft License Client program will be started for you.
To obtain a license automatically you will need to be connected to the Internet and allow outgoing connections to license.easysoft.com on port 8884. If you are not connected to the Internet or do not allow outgoing connections on port 8884 then the License Client can create a license request file which you can mail, fax or telephone to Easysoft.
Once the License Client has started you are presented with a menu of options which allow you to:
[n] obtain a license for the desired product
Obviously, if you have not got any other Easysoft products licensed then option [1] will not show any existing licenses. To obtain a license select one of the options from [2] onwards for the product you are installing, e.g. currently, option [3] for licencing the JDBC-ODBC Bridge. The License Client will then run a program that was installed for that product which generates a key which is used to identify the product and operating system (we need this key to license you)
.
Assuming you have picked a product which is installed (or in the process of being installed) then you need to supply:
3. An email contact address (you need to specify this if you email the license request to us).
4. Your telephone number (you need to specify this if you telephone the license request to us).
5. Your fax number (you need to specify this if you fax the license request to us).
6. A reference number. When applying for a trial license just hit <return> on this field as this field is used to enter a reference number we will supply you for full (paid) licenses.
You will then be asked for a method of obtaining the license where the choices are:
[1] Automatically by contacting the Easysoft License Daemon (this requires connection to the Internet and the ability to support an outgoing TCPIP connection to license.easysoft.com on port 8884).
[2] Write information to file so you can fax, telephone it (the license request is output to license_request.txt and you can telephone or fax this to Easysoft).
If you choose to obtain the license automatically, the License Client will start a TCPIP connection to license.easysoft.com on port 8884 and send the details you entered at the prompts above and your site number. No other data is sent. The data sent is transmitted as plain text so if you do not want this information possibly intercepted by someone else on the net you should choose [2] and telephone or fax the request to us. The License daemon will return the license key, print it to the screen and make it available to the installation script in the file licenses.out.
If you choose option [2] the license request is written to the file license_request.txt and you should exit the License Client via option [0] and complete the installation. Once you have mailed, faxed or telephoned the license request to us we will return a license key which should add to the end of the file <install_path>/easysoft/license/licenses.
If during this process any warnings or errors are output please mail the output to support@easysoft.com and we will rectify the problem.
If you ran the License Client, the install script will detect whether any licenses were automatically obtained and ask you if they are to be installed in the <install_path>easysoft/license/licenses file. You should answer y to this or the JOB Server will not be licensed and will not accept connections from JOB clients. If you choose not to have the licenses added to the licenses file then you can do this manually later by copying the lines in licenses.out to <install_path>/easysoft/license/licenses.
|
The shared objects installed are NOT stripped. You may strip them if you wish but this may affect any support Easysoft can supply. |
.
# cd <INSTALL PATH>/easysoft/job
It should respond by saying that:
The port is set to 8031 in this installation."
To stop the job server, ensure that you are logged in as the root user, then use the following script:
Response with 'y' to kill the processes shown.
To remove the Easysoft JDBC-ODBC Bridge from your Unix system, you need to:
1. Log in as the user who performed the installation (usually root).
The system displays the current directory.
Double-check that this is the directory under which you installed the Easysoft JDBC-ODBC Bridge:
(Check that you are in the right directory).
© 1993 - 2025 Easysoft Limited. All rights reserved. Oracle is a registered trademark of Oracle Corporation and/or its affiliates. Other trademarks and registered trademarks appearing on easysoft.com are the property of their respective owners.